Showing posts with label Wendy Aspinall. Show all posts

Monday, July 11, 2022

Painted Shells by Wendy Aspinall


After a recent trip to Rhode Island I came back with a bag full of large shells. Beautiful creamy colored shells with a large area perfect for painting.

Supplies you will need
  1. Gesso the inside of shell, two coats with drying time between. Spray ArtFoamies with water, rub a intense block on stamp. Stamp. Dry.
  2. Paint in with Acrylic paints colors of your choice. Dry. Add shading and more colors.
  3. Add details with Posca paint pen. Rub tiny amounts of shading grey to the shell . This will knock the colors back. This step is optional.
  4. Add foil glue to edge of shell and any areas you to like to highlight with the gold foil. A heart or halo.
  5. When glue is clear add the foil and brush off loose foil over a trashcan.
  6. If some area didn’t stick. You can re apply the foil glue and foil again. Let's dry completely overnight.
  7. Add a coat of polyurethane varnish to seal gold and painted area. 


Enjoy your shells. They make beautiful receptacles for your rings or in my studio for my pins and needles. Practical and stunning.


Video tutorial available here: https://www.wendyaspinall.art/

Thank you,
Hugs Wendy

Monday, May 16, 2022

Pretty Face Boxes By Wendy Aspinall.


Hello friends! Who doesn’t love a special box to put treasure in? Who doesn’t love a pretty face? With my boxes , you get both. It’s fun and whimsical. More importantly, it’s easy and practical. You could paint a few over a weekend.

I’m using acrylic paints in the the same way i would use watercolors in this project to produce a soft , ethereal treatment. Lots of watery washes of color that you can build up. The results will delight and please you.


Supplies
Step by Step -- Video tutorial at wendyaspinall.art
  1. Prime the outside of your box with two coats of acrylic gesso. Let dry.
  2. Spray the ART FOAMIE face stamp with water and then the rub the Derwent inktense block over the stamp face. Stamp on the lid of the box. Before the impression dries, smear the impression into a round or oval shape. This is your first layer of the hair.
  3. Now re stamp the face in the middle of the hair smear shape.
  4. Paint face with mix of Burnt sienna and Gesso or white acrylic this combination will make a beautiful skin tone. The key to this technique is lots of watery layers. Use finger to Smooth and bend. Let dry. Add another later. Let dry.
  5. Paint in a neck and body.
  6. Paint in the white on the eyes and the black of the eyes.
  7. Paint in the nose and eyes lids. Let dry.
  8. Add pink to cheeks and lips.
  9. Paint hair, adding layers with drying time between. Like painting with watercolor you want to build up your color and contrast. Let dry.
  10. Using the same technique as the face add a pattern to the background of the box. (Scribbled rose) Art Foamie. Be careful to avoid stamping over the face.
  11. Color in with the watery burnt sienna and gesso mix. Don’t worry if it bleeds out this is the affect you want to get.
  12. Color in the background with more watery acrylic in a different color. Let dry.
  13. Do the same to all the sides. Let dry.
  14. Add more layers of pattern with a text (gibberish) art Foamie stamped with Stazon ink in black. Be light handed, this wants to add a light image.
  15. Add more pattern this time with a the (dot to dot) art Foamie stamp stamped in white gesso or acrylic paint full strength not watered. Let dry completely.
  16. Add colored wax to latch and hinges and side of box.
  17. Add scrapbook paper to bottom to finish.

Thank you for watching and I hope you will try this acrylic watercoloring technique yourself.

Hugs Wendy

Monday, January 24, 2022

My KaePea Journal - Wendy Aspinall

Every month KaePea sends her Patreon members image sheets of her art. So far each month I have put them in a folder for inspiration. But this week I decided that I was going to challenge myself and others to take those sheets and use them to kick start our inspiration.

SUPPLIES
  • Journal
  • Monthly image sheets
  • Derwent ink tense blocks
  • Watercolors
  • Watercolor brush round No 8
  • Scissors
  • Glue stick
  • Rubbermoon stamps
  • Black STARZ on ink
  • Brown and black Stabilo pencils
  • White Posca paint pen Scissors and glue stick.
So I found an empty journal and set about pulling all the sheets I had and downloading the ones I didn’t have hard copies of. I also pulled my ink-tense sticks , watercolor brushes and watercolor pallet. Began with cutting the sheet up to make new layouts.


It has been so fun and inspiring, I’m hooked. I will be cutting every one of the collage sheets I get now. If you’re interested in getting collage sheets sign up for www.patreon.com/kaepea

Hope you will join me and get out your scissors and start cutting.

Hugs Wendy

Monday, September 27, 2021

Seek Your Inner Goddess Standing Figure by Wendy Aspinall

Seek your inner Goddess. Tell yourself everyday , you are unique, you are beautiful, you are powerful, you are amazing.

But to remind you, there is an easy project to make a free standing Goddess figure.

Supplies:

Trace the shape of the figure it out Art Foamie on the MDF (add a 1/4 inch border) and cut out with either a jig saw or Coping saw. Sand edges. Paint with white gesso and let dry. Paint with watercolor grounds. Let dry overnight.


Spray the Figure it Out stamp with water and add color with watercolor crayons. Stamp on copy paper.
Let dry. Cut out and decoupage to the wood cut out. Let dry.

Paint the face, hair and dress. Spray the flower stamp and add color with crayons, stamp on dress.
Color in. Let dry. Add details with Posca pens.


Punch out flowers to add to the head and background. Let dry. Glue scrapbook paper on back of Goddess and wooden block. Add leafing glue to sides and add gold leaf. Let dry.


Glue the doll shape on to a square wooden block. Let dry. Add quote. Seal with clear Varnish , two coat with drying time between.

I hope you will try this yourselves.
Hugs Wendy

https://blissangels.blogspot.com/


Monday, August 23, 2021

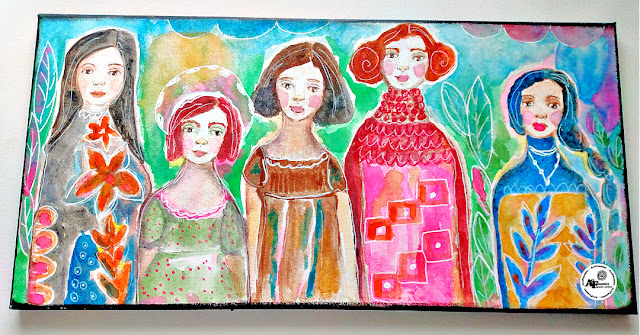
Soul sisters By Wendy Aspinall


WELCOME BACK!
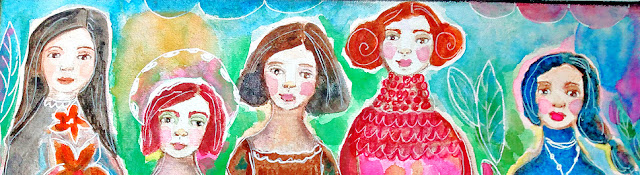
 I'm Wendy Aspinall of Bliss Angels Studio here to share with you my latest project using ArtFoamies I love the Good hair Art Foamie. It makes the production of a lifelike figure so much easier to do. Yes, you can print it as is and color it in but you can push the Art Foamie a little more to produce a stunning image.

Supplies for today's project include:
  • Kae Pea | Good Hair Day | Foam Stamp
  • White pre gesso canvas 20x10
  • Clear watercolor grounds
  • Brown water soluble crayon
  • White fine tip Posca paint pen
  • Brown Stabilo pencil
  • Watercolor paints
  • Brush marker Pro pens
  • Paper towel
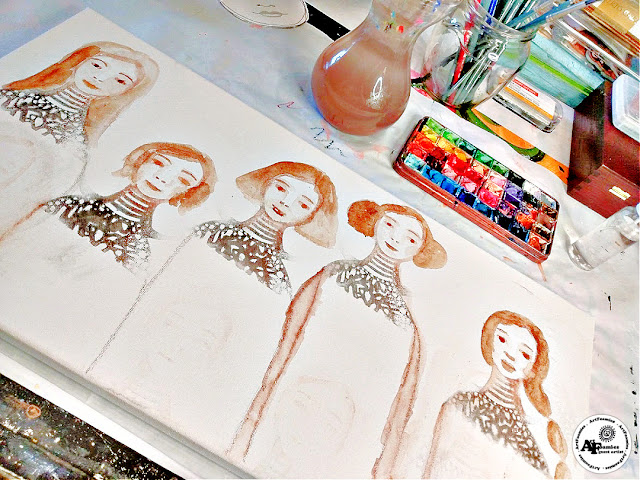
My canvas was pre-gesso and pre-painted with clear watercolor grounds and left overnight to dry.
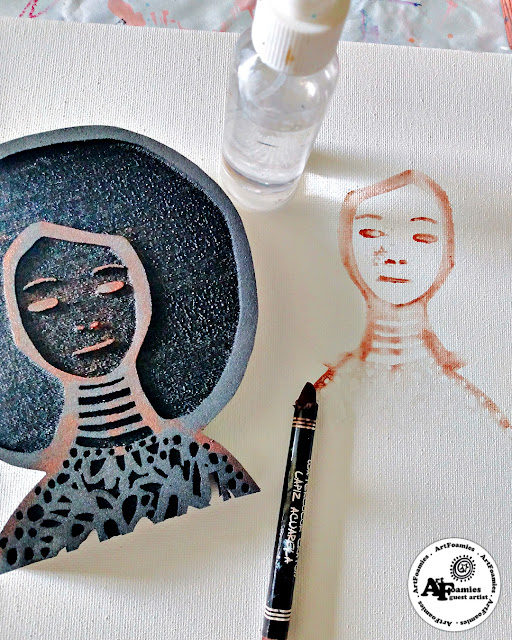
Spray the ArtFoamie stamp with a fine mist of water and rub the area of the face and body with a brown water soluble crayon.


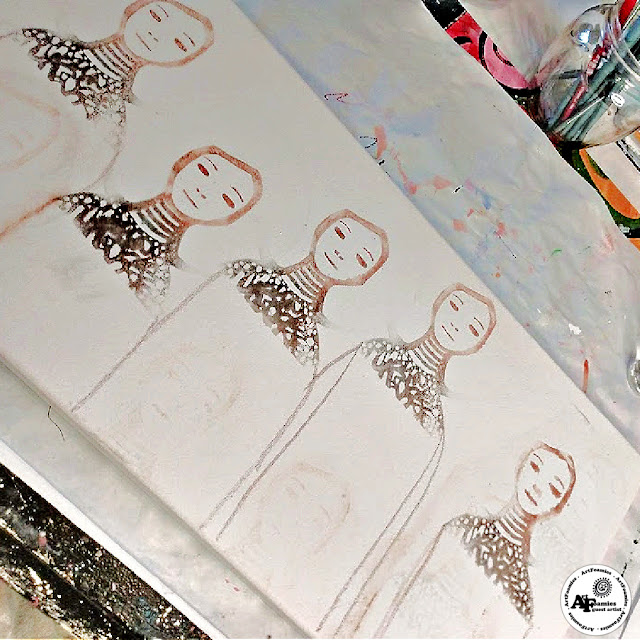
Stamp on the canvas. I stamped several figures. Let dry completely.


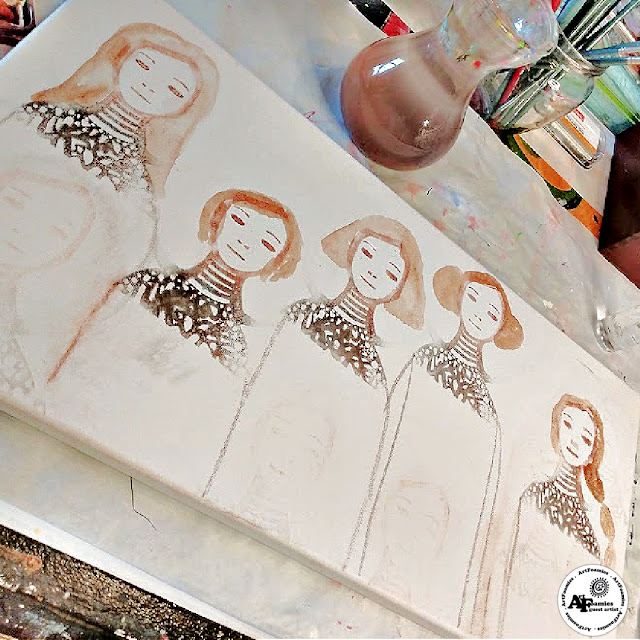
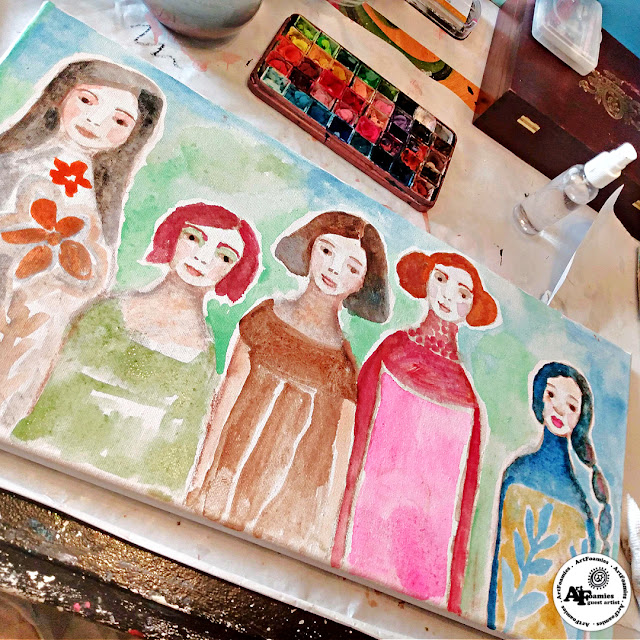
I added all the different hair styles and detail with burnt sienna watercolor. This color makes for a beautiful skin tone that you can layer to add more depth.


Don’t be afraid to add more color and water to let the color blend into each other. If you don’t like it , use a Thirsty Brush or a paper towel to take it away.


Also I decided I didn't like the black pattern on the necks and tops of dresses so I used isopropyl alcohol on a baby wipe to take it away.


Add lots of watercolor layers with drying time in between.
.
I used a white fine tipped Posca paint pen and brown Stabilo pencil to define the eyes and outline.

When it’s completely dry , paint the sides of canvas with black acrylic. Spray a coat of Varnish to protect.


Hope you enjoyed today's project! 

Wendy 
http://blissangels.blogspot.com
http://blissfullatcswap.blogspot.com

Monday, June 7, 2021

"Flowers are like Friends” Fridge Magnet Shrine by Wendy Aspinall

HEY FRIENDS! Wendy Aspinall here and I'm back again as this week's guest artist for ArtFoamies.

Flowers are like friends, They bring color into our lives. I wanted to make a reminder of that with a pretty shrine filled with a dimensional bouquet of flowers that I could put on my fridge to see every day. I hope you will enjoy seeing my friendship shrine and maybe create one yourselves to celebrate your friendships.

SUPPLIES

STEP BY STEP

  • Paint the lid of the paper Mache box with white gesso. Both inside and out. This is going to the base of the shrine. Let dry.
  • Paint stripes on the side of the shrine with blue watercolor.
  • Cut and paste scrapbook paper to cover the back of the shrine.
  • Using the lid as template, cut a piece of the watercolor paper to fit inside the lid as the background. Stamp a vase and flower bouquet on the paper and color. Add foam tape to the back.
  • Stamp additional flowers, leaves, and vases (three vases and at least two of each flower) on another sheet of watercolor paper. Paint and fussy cut.
  • Add foam tape to the back of all the pieces.
  • Arrange and layer the additional flowers and leaves to the background image to give dimension.
  • Add the completed background to the inside of the shrine.
  • Add quote.
  • Paste Dresden trim to the lip of the shrine.
  • Lastly add magnets to the back of the shrine.

Hope you enjoyed my project today! See you again soon!

Wendy

Monday, May 31, 2021

Don’t Breathe Air, Breathe Life By Wendy Aspinall


HEY FRIENDS! This is Wendy Aspinall and I'm the guest artist this week for Art Foamies. I found fun quotation “Don’t breathe air, breathe life.” Fish don’t breathe air, but are full of life so I wanted to incorporate two things together. I also love Red tin roofs sardine stamps. They are really fun and quirky. So please, enjoy my Plaque project and I hope you’ll try this yourselves.

SUPPLIES 
STEP BY STEP 
  • Roll out paper clay and using the backside of the ArtFoamie as a template cut out four fish. Don’t worry if the edges are rough. I sanded them when dry
  • Press into the clay with the ArtFoamie, using the side with the details.
  • Let dry on sheet of paper towel. This may take a few days. Turn over half way though so the fish stay straight.
  • When completely dry, sand off any rough edges until smooth. Be careful --  the fish are fragile. 
  • Add a coat of white gesso. Let dry.
  • Paint each fish a different color, but add touches of the other colors to highlight the texture.
  • Add the brown and then copper. Paint in eyes with white and black acrylic. Let dry.
  • Paint the edge of the wood plaque in the same brown acrylic paint. Distressed the edges with the sandpaper.
  • Cut scrapbook paper to cover the back and front of the plaque. Glue in place. 
  • Drill two holes for wire hanger.
  • Glue on the fish and quote.

Hope you enjoyed my project today! See you again soon!

Wendy


Tuesday, January 19, 2021

Spread Love not Hate by Wendy Aspinall

HELLO EVERYONE! I am Wendy and I have come over from the Relics and Artifacts Muse design team to play with some of the Art Foamies and Rubbermoon stamps. 

We live in extraordinary times, each one of us can decide if we want to spread love in the world or hate. Never has loving thoughts and actions been so important to spread in the world. With this thought in my mind when I was asked to prepare a guest blog post for Art Foamies’s blog. I thought what if I made a key holder to place just near the door so as I picked up my keys to go out I would be reminded of this important message.


Today's project features: 
I started by making some of my own printed tissues paper. I sprayed the tissue with Delusion Shimmer Inks in Hot Pink and Periwinkle Blue. 


When the tissues are dry I randomly stamped the tissues with Balzer Designs | Writer's Block and Kae Pea | Microcosms. Don’t be afraid to overlap the stamps. When dry, I added Distress Oxide Spray in Mustard Seed and let dry again. 


Tear the tissues in pieces. I especially like to use the tissues over white acrylic so when you glue them down they go transparent and make a beautiful effect. But let’s get on with our Love not Hate key holder project.

The canvas is approximately 4 x 4 inches, I started the first layer with white gesso, covering the whole canvas giving a smooth surface for the other layers to come.


Once the gesso has dried, I added a layer of Craft Smart acrylic paint in Peacock Blue to the side and edge using a large flat brush. Let dry. Then I glued on the pieces of tissue with Mod Podge in Matte finish and added a layer of the glue over the whole surface.


With white gesso, paint the shape of a heart onto the middle of the canvas. 


Spray the Sandra Evertson | Ex Voto Heart and  Sandra Evertson | Ex Voto Heart stamps with more of the Delusion Shimmer Spray in Hot Pink and then brush on white.


Stamp in the middle of the canvas. Set aside to dry.  


Now ink up the Sandra Evertson | Ex Voto Heart again with StatzOn Ink in Jet Black and stamp over the previous impression. Let dry again.


Use a Posca paint pen in white to outline the heart and wings and flames and add dots. Also ink up the ArtFoamies with StatzOn Ink in Jet Black and randomly print all over the canvas. Also ink Sandra Evertson | SE6009C - Sacre Coeur and add the tiny heart in right corner. Color in with a Posca paint pen in Silver. You can add some of the tiny hearts to the sides too.


Stamp out the saying with tiny alphabet stamps on card stock. Cut and glue onto heart. 


Add some water soluble wax crayon in yellow and green, blending it with your finger. Lastly I added some alcohol ink drips using Tim Holtz Adirondack Earth tones in Ginger.

Predrill a hole for the 7/8 inch cup hook and then screw in the hook. You may need a pair of pliers to tighten it.


Lastly staple a square of decorative paper on the back of the canvas and add a hanging fitting.


I used my favorite colors but this would look just as pretty in any color combination to suit your home. I hope you will have ago and spread your love where ever you go.


Hugs and LOVE

Wendy
 

SUPPLIES