Showing posts with label Writer's Block. Show all posts

Monday, April 4, 2022

Journal Page by Liv ORMCraftyDesigns Marmara

Hello Everyone! Liv here, and I am so excited to be back for another guest designer post. Art journaling is just so relaxing to me so I decided to do another set of art journal pages. I was able to bring in four different stamps into this project. The stamps I used were,
First up, I stamped using the Writer's Block stamp and embossing ink. I covered it with white embossing powder and then used my heat gun. I decided to use three different colors from Lindy's Gang and once dried I started the stamping. I had some excess ink on the page so used it on a watercolor paper and stamped the Diamond Moon on it.


I cut it out and added it to the page for further dimensions.


I hope to have the video up soon on my YT page on how quickly this page came together, but here are some close-ups so you can see the beautiful textures these stamps added.


Hope you enjoy these pages and get some time to craft away too.

Liv  

Monday, February 14, 2022

The Business of Life Art Journal by Renae Davis

The beginning of a new year and the cold fronts that sweep the western part of the world, January feels like a very contemplative blue month. Maybe that’s just me! At any rate, I wanted to document a time of reflective thinking for new season that’s upon us.


Supplies:
STEP 1: For the background, I sprayed a light amount of Distress Oxide Ink Sprays (Weathered Wood, Chipped Sapphire, Hickory Smoke) blended with water across the two page layout in my art journal. I sprayed the bottom and side edges with blue to frame the layout.


STEP 2: I applied a generous layer of metallic silver acrylic paint onto Writer’s Block Foam Stamp by Balzer Designs using a brayer and stamped over most of the entire layout.

 
STEP 3 AND 3.2: I applied a thin layer of black metallic acrylic paint onto Film Strip Foam Stamp by Red Tin Roof using a brayer and stamped over the entire left edge side of the layout as well as the bottom right corner in an angled direction.


STEP 4: I stamped across the entire bottom layout with Hollyhocks Foam Stamp by Donna Downey with a heavy body blue gray acrylic paint. This layer will serve as a shadow background for the next layer of flowers.

 
STEP 5: To add more flowers to the front of the layout, I stamped the same Hollyhocks Foam Stamp in a dark Prussian Blue by bringing down the stamp a few inches from the light blue layer in the back.

 
STEP 6: For the focal images, I applied a thick layer of black gesso with a brayer onto both of the Two Birds Foam Stamp set by Donna Downey and stamped them on the middle left side of the layout. I then drew a thin black line underneath them to ground them to the layout.

 
STEP 7: Using the same black gesso and brayer, I applied thin layers of gesso onto both of the leaves from Branch Out Foam Stamp Set by Maxi Moon and stamped them around the border of the entire layout.


STEP 8: To lighten up the page a bit from being so dark, I added a thick layer of heavy body silver acrylic as a border around the layout and filled in the circle ends of the brands from the branch stamps.
I finished the layout by adding a quote in the middle and adding splashes of black and silver acrylic paint over the layout.


YouTube Process Video Link: https://youtu.be/Pj9PsD1gRKw

Renae

My Blog: www.splendiferossity.com
Instagram: @redhedtm
Facebook: @splendiferossity
YouTube: @redhedtm
Pinterest: @redhedtm

Monday, November 8, 2021

Art Cards and a Journal Page by Nicole


HELLO ARTISTS! I am so excited to share another guest artist post with you. When I saw the new ArtFoamies a few months ago, I not only knew I wanted the “twig” stamp, but I also knew exactly what I wanted to do with it!

I don’t know about you, but I enjoy sending mail just as much as I love seeing a hand-addressed envelope in my mailbox. However, I just can’t send store-bought cards. I think I’ve created homemade cards most of my life. My cards have evolved from crayons and markers to rubber stamping and now I love sending small works of art. The art becomes a gift, and the recipient can choose to frame or display their card if they want! With my stash getting low and a couple birthdays approaching, I grabbed my ArtFoamies to begin.


To save time, and because it’s just fun, most of my card making sessions include creating multiples of the same card. This time I grabbed six pre-cut 4x6 index cards. I discovered these extra heavy index cards that are archival for ICAD (index card a day) and have been using them to create small works of art ever since. First, I applied two layers of gesso. I like to apply in one direction, let it dry, and then apply in the other direction. I think this helps with a smoother front and even coverage. Next, I ripped book text and ledger pages and secured them to the front of my cards with matte medium.


Once the book text was dry, I applied gesso again. This time, around the edges of the ephemera and other random other places at full strength and watered down. I also splattered it! I love how gesso interacts with old papers. Adding the gesso embeds the text and provides another layer of interest.


After the gesso was dry, I grabbed the “twig” and stamped it with sepia India ink. I used a small gel plate as my stamp pad and palette throughout the entire process.


Once stamped, I watered down the leftover ink to spatter and paint on the cards.


While the sepia ink dried, I also stamped a twig on each envelope for my art cards along with, of course, some splatters.


To help with contrast and add even more interest, I used Payne’s Gray acrylic paint watered down and full strength around the stamped image, and then I stamped the Writer's Block (Small) ArtFoamie also in the Paynes Gray.


For a final layer of interest, I grabbed turquoise paint and the Right Here ArtFoamie and stamped it. For this process, I used a piece of dictionary paper to mask the cards. This paper actually became important in part 2! I also painted a bit of the watered-down turquoise on the cards.


At this point, the centers of the Twig stamp were becoming a little lost, so I filled the insides with gesso. Also, I splattered large drops of gesso on the top of the cards.


To finish off the cards I added a piece of colored card stock behind with some foam squares. Check out the process of making these small works of art in a video here:

https://youtu.be/Je7WSQHVZd8


I am so excited to send these cards. In fact, I already sent two of them! To add a message on the cards, I simply used some washi tape and a piece of printer paper.


However, I can only send 5, because I did not add the blue cardstock to one of the cards!


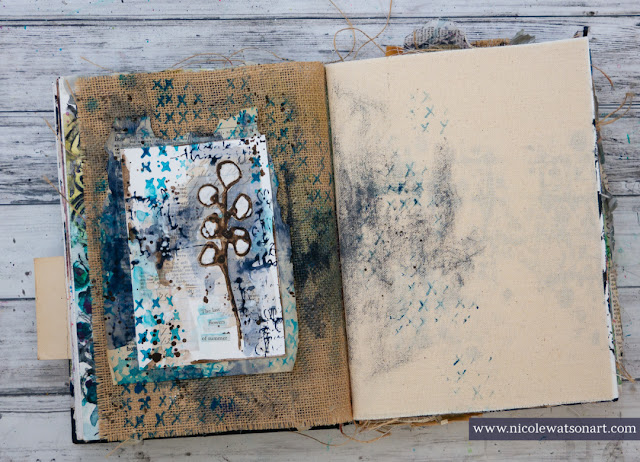
Since I liked my small works of art so much, I decided to stick one in my art journal! I opened to a burlap page in my Dina Wakley journal, and I played a bit with some of the off-stamp images (you can see me create these in the video above). In the end I decided to grab that dictionary page I used for masking to layer behind my piece of art.

One thing I’ve learned in creating is to stamp off my images, and save any bits of paper or masking paper to use for future projects. These unplanned papers are always the best to create with!

I stuck the dictionary page down, added some more foam Right Here stamped images on the burlap. ArtFoamies stamp so amazingly well on burlap. Then, topped the pages off with some Payne’s Gray and some sepia splatters. The final step was to adhere my art card and then I added a small sticker that said “the last flowers of summer.” The twig image reminded me so much of the brown, tired flowers from summer in my garden.


Check out the Part 2 video to see the simple process of creating a journal page with one of the art cards here:

https://youtu.be/JxQArmQ_ftY

I hope this inspires you to create some small works of art to mail. I’d love to see your creations with your ArtFoamies inspired by my technique. All the supplies are linked in my videos if you’d like to use the same index cards. When you do, tag me on Instagram so I can see your amazing art (@nicolewatsonart).


-Nicole
http://nicolewatsonart.com


Monday, July 26, 2021

Double Spread Journal Page with ArtFoamies by Nicole Watson


HELLO ARTISTS! I’m back with another guest artist post using FOUR different ArtFoamies! I just love how amazingly well they layer together…but we’ll get to that in just a minute.

Have you been following along or participating in this year’s Index Card a Day (ICAD) challenge? I’ve used ArtFoamies several times on mine and recently created one using ArtFoamies that I knew I wanted to explore again in a larger format. This little card was an experiment, or an accident really, as I was very much losing my creativity!

As I was thinking about what to create for my tutorial, I remembered that ICAD. I knew this was the perfect time to explore (or attempt to recreate!) my accidental card. So, I opened my Dina Wakley Media journal, covered an entire two-page spread with gesso and began.

Today's project features: 


First, I stuck down a bunch of book text and dictionary pages with matte medium. Once dry, I embedded these pages a bit with gesso. This gesso layer adds so much interest, it’s amazing! Once that gesso was dry, I realized I didn’t use any of my favorite handwritten ledger pages. So, I grabbed one of those and added a few pieces, again topping with some gesso. One thing that draws me to mixed media is the combination of mediums, layers and “what ifs” that fill the page or canvas. The gesso often helps to create those happy accidents.


Next, it was time to start the ArtFoamies layering! I grabbed the large Writer’s Block stamp and stamped it mainly around the edge of the journal pages using Golden’s new So Flat paint in Red Violet. I used a palette knife to spread paint across the Foamie and also used a piece of patty paper as a temporary ink pad. Using both methods will give you different stamp results with thicker, thinner, lighter or darker strokes, which will all add interest to your background. Don’t worry too much about how this layer looks. If you don’t have even stamping or perfect lines, there will be many more layers on top. While there was still wet paint on my patty paper, I sprayed it with a little water to make it thinner and spread it loosely a few places between the stamps, again to add interest.


To add another layer of interest, I grabbed Bombay India Ink in Sepia and spread it on the page over the Writer’s Block stamp. I left some of the stamped images without the ink on top, and also put some over the white page as well. It looks kind of like a river of India ink. This is where intuition kind of kicks in. In some areas I kept it darker and in others lighter, watered down a bit. I let it dry, and then added a bit more ink where I wanted some darker contrast. Again, this is another background layer to build interest, so it doesn’t have to be perfect!


Then it was time for the next ArtFoamies layer! I picked up the Candy Love stamp, and using the same technique with the patty paper/palette knife, I stamped it several places on my pages with Golden So Flat Payne’s Gray. To create the watery/cloudy effect around the stamps, I used my paintbrush in some water while the stamped image was still wet to blur the edges and picked up some paint as needed from my palette. For this process I worked in stages, stamping a few at a time and softening them. As the stamped images dried, I continued to soften them in places, removing paint so they looked a little aged or more like watercolor. (This process might be a little easier to understand when you watch the video!)


At this point, my pages were starting to look a little dark, so I wanted to add some white back into the edges. I grabbed the smaller version of the Writer’s Block stamp and used it with gesso to bring back some white space. I also softened the edges of this stamping a bit with watered down gesso. Then, so the gesso didn’t look like it was all floating on top, I used a bit of watered-down Payne’s Gray over some of the stamped images to push parts back.


With my background finished and drying, it was time to figure out what to do next. Often it is so hard to cover up a background, isn’t it? I pulled out a bunch of vintage photos, some tags, the dried palette papers, book pages I’d stamped the Foamies off on, and some rust-dyed fabric an artist friend gave me


I added gesso to the white tags, collaged pages, Sepia ink, and more ArtFoamies. I wanted to use the Croquet stamp some place on these tags because the shape matched part of the Candy Love stamp. I used this Croquet stamp with the Sepia ink several places on the tags. I also added some more of the small Writer’s Block stamp.


This collage process took me a while! The only thing I knew for certain was that I wanted to use the photograph of the lady somewhere. I went back and forth on the layout, collaged papers, and ideas flooded my head! I grabbed some packing paper to sketch on with my stabilo all pencil to create a leaf and some circles for the layers. I layered, tore apart, layered again…and got frustrated several times.


You can watch how all those layers came together in the video below!


Didn’t these ArtFoamies layer together so well? Using a script, a sold graphic one, and a mark-making one created amazing layers on my page. I’d love to see your creations layering the ArtFoamies you have. When you do, tag me on Instagram so I can see your amazing art (@nicolewatsonart).

-Nicole
http://nicolewatsonart.com


Tuesday, January 19, 2021

Spread Love not Hate by Wendy Aspinall

HELLO EVERYONE! I am Wendy and I have come over from the Relics and Artifacts Muse design team to play with some of the Art Foamies and Rubbermoon stamps. 

We live in extraordinary times, each one of us can decide if we want to spread love in the world or hate. Never has loving thoughts and actions been so important to spread in the world. With this thought in my mind when I was asked to prepare a guest blog post for Art Foamies’s blog. I thought what if I made a key holder to place just near the door so as I picked up my keys to go out I would be reminded of this important message.


Today's project features: 
I started by making some of my own printed tissues paper. I sprayed the tissue with Delusion Shimmer Inks in Hot Pink and Periwinkle Blue. 


When the tissues are dry I randomly stamped the tissues with Balzer Designs | Writer's Block and Kae Pea | Microcosms. Don’t be afraid to overlap the stamps. When dry, I added Distress Oxide Spray in Mustard Seed and let dry again. 


Tear the tissues in pieces. I especially like to use the tissues over white acrylic so when you glue them down they go transparent and make a beautiful effect. But let’s get on with our Love not Hate key holder project.

The canvas is approximately 4 x 4 inches, I started the first layer with white gesso, covering the whole canvas giving a smooth surface for the other layers to come.


Once the gesso has dried, I added a layer of Craft Smart acrylic paint in Peacock Blue to the side and edge using a large flat brush. Let dry. Then I glued on the pieces of tissue with Mod Podge in Matte finish and added a layer of the glue over the whole surface.


With white gesso, paint the shape of a heart onto the middle of the canvas. 


Spray the Sandra Evertson | Ex Voto Heart and  Sandra Evertson | Ex Voto Heart stamps with more of the Delusion Shimmer Spray in Hot Pink and then brush on white.


Stamp in the middle of the canvas. Set aside to dry.  


Now ink up the Sandra Evertson | Ex Voto Heart again with StatzOn Ink in Jet Black and stamp over the previous impression. Let dry again.


Use a Posca paint pen in white to outline the heart and wings and flames and add dots. Also ink up the ArtFoamies with StatzOn Ink in Jet Black and randomly print all over the canvas. Also ink Sandra Evertson | SE6009C - Sacre Coeur and add the tiny heart in right corner. Color in with a Posca paint pen in Silver. You can add some of the tiny hearts to the sides too.


Stamp out the saying with tiny alphabet stamps on card stock. Cut and glue onto heart. 


Add some water soluble wax crayon in yellow and green, blending it with your finger. Lastly I added some alcohol ink drips using Tim Holtz Adirondack Earth tones in Ginger.

Predrill a hole for the 7/8 inch cup hook and then screw in the hook. You may need a pair of pliers to tighten it.


Lastly staple a square of decorative paper on the back of the canvas and add a hanging fitting.


I used my favorite colors but this would look just as pretty in any color combination to suit your home. I hope you will have ago and spread your love where ever you go.


Hugs and LOVE

Wendy
 

SUPPLIES