Showing posts with label Artfoamies. Show all posts

Monday, July 25, 2022

Decorated Ribbon by Robin Seiz

Hi Friends,

Summer is certainly here! Our temperatures here in Pennsylvania are in the high 80’s and 90’s right now! I work in my garden in the morning and I’m happy to get out of the heat in the middle of the day and come inside to create.

Because I am an avid gardener, I selected a project which represents this time of year. What better artfoamies to use than a moth and beautiful leaves! The completed project is a spool of one long strip of decorated ribbon. I can use this and cut it up for journal embellishments, card embellishments, or perhaps decorate a gift with some of it.

I bought several of these wooden spools several years ago, thinking “someday” I would find a use for them — and this project is it!


Because my studio is packed up right now, I have limited supplies and I’m trying to use scraps and papers I have used to clean off my brayer.


I ripped these into pieces approximately 2 1/2” wide. The lengths were varied depending on the paper.


Since the plan was to sew them together to make one long strip, I arranged them so they would be complimentary and pleasing to the eye. I then sewed them together two pieces at a time. I used my embroidery stitches, which in retrospect, worked ok, but not perfectly, because I didn’t use a backing. I really didn’t mind, it added to the organic nature of this project.


Once they were all sewn together, I started stamping. I decided to use black so the ink wouldn’t compete with the background colors.


My original intent was just to leave the stamps the way they were, letting the color shine through the stamp. But I felt they needed more. I started embellishing them with a white Uniball gel pen and I loved the difference. It made each and everyone of them pop off the page.


Here is a short video of the entire completed paper ribbon.


Once complete, I used washi tape to adhere the end to the spool. I wrapped the paper ribbon around the spool and neatly tied it with Sari ribbon.
 

Even if I never use the paper ribbon, this will make a lovely decoration in the new studio. I could even unwind it a little to show off the ribbon.

This is an easy project. Even if you don’t have the wooden spool like the one I used, get creative and use something else that you have around the house. I think a small ball jar would work really well. It could also act as a holder for brushes or pens.

If you want to see other things that I have created (or my garden) follow me on

https://www.facebook.com/robin.e.seiz
https://www.instagram.com/robinseiz

Monday, June 13, 2022

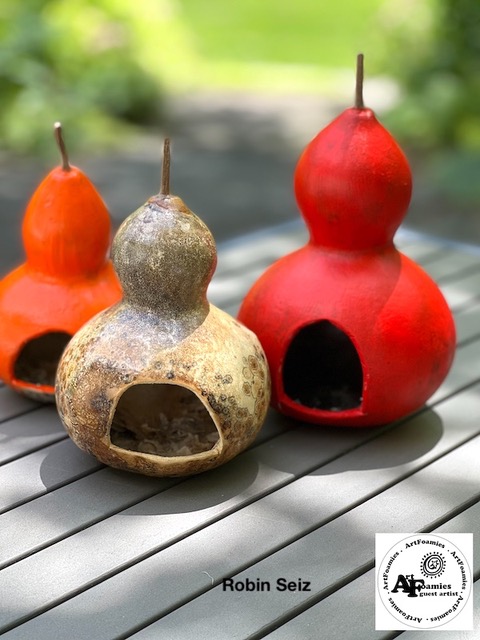
Painted Gourds - Robin Seiz

Hello Friends! I am an avid gardener and last year I grew gourds for the first time. They were so fun! They grew up the fence. I let them dry on the vine and then cut them off and let them dry more in the house over the winter. This spring, I cut holes for the birds to make a nest and decided they would be the perfect thing to decorate with ArtFoamies. You may not grow gourds, but I hope this blog helps your imagination go wild. Art Foramies can literally be used on ANY surface you choose!

I started with the gourds in their natural color. I must say that I was hard to paint two of them, as I love the organic look of the natural color, but paint I did. I wanted them to be bright as they will hang in trees in our meadow or in my garden.


After they were painted I realized that the new bug ArtFoamies by KP were the perfect stamp for this project. I applied paint to the ArtFoamie with a brush, but you could use a stamp buddy as well. I used the small moth and complimentary paint colors. I did try other bug ArtFoamies, but found they were too big to stamp well because of the size of the gourds. If the gourds were larger, the butterfly would have definitely worked.


After they were stamped I made some small embellishments; I painted the lines, the dots, and the wrote Bugs on the smaller gourd in green paint. This was a fun and easy project to do. I didn’t do a lot of fussing to get the moths perfect. They are going to be seen from a distance.


They will be sprayed with a clear glaze to protect them from the elements. I hope you enjoyed this simple project and that you get creative with where you stamp your ArtFoamies.


Robin

Monday, May 2, 2022

Artsy Rolodex

 Artsy Rolodex

Hi, it's me Patti Campbell! This month I would like to share my fun Artsy Rolodex project with you. This idea came about because I was trying to think of a good way to keep the addresses from the Moonie RAK list close at hand while also making it a piece of art.

I wanted something I could access easily, would fit on my desk, and would be fun to look at. First I thought I would just buy an address book and art it up but that wasn't quite what I wanted. Then I thought it would be cool to find an old Rolodex and be able to customize each section/page. 

I happened to be in my car when this idea struck so I went to Staples on the off chance they might have a Rolodex, and to my surprise they did! I bought it and went home to get makey. 

The Rolodex was designed for business cards, so I pulled out my scrap box and my paper cutter and started to cut some of my older pieces of artwork into business card size.


 I decorated some of them with ArtFoamies. I used Wingspan by Sandra EvertsonMixed Media Mashup by Kae PeaFloradala by Kae PeaFlora Elements by Elizabeth St. HilaireTulip by Sarah MatthewsTree of Life by Gypsy Soul, and the April 2022 freebie bunny. I also used several RubberMoon stamps.


I added the addresses and inserted them into the pockets in the Rolodex. For the purpose of this blog I made fake addresses; no real addresses are in these pictures. Because I like to be different and there are no rules in creating art, I alphabetized my address book by first name. Then I went about decorating the alphabet tabs. At first I was just doing it randomly, but then I thought it would be fun to make each letter correspond with a famous artist and to decorate the tab in the style of that artist. 

For some I painted the artist and for others I made a painting in their art style or recreated one of their pieces. I started with my favorite, Frida Kahlo, creating a recognizable portrait with her iconic brows. I recreated The Scream by Edvard Munch for the "E" tab. For "G" I did a landscape in the style of Georgia O'Keeffe. For "H" I recreate a self portrait of Herrad von Lansberg. I recreated Golden Tears (Freya's Heartache) by Klimt and so on and so forth.


It is still a work in progress, but it's really fun to flip through and look at all the art. It was fun to make art that was not only decorative, but also functional. I hope this inspires you to get makey in unusual ways!


Love and laughter,

๐Ÿ’œPatti๐Ÿ’œ

Monday, April 11, 2022

More Art Journal Pages by Liv

Hello Everyone! Liv here, and I am back for my guest designer post. I decided to do another set of art journal pages but this time in a more subtle color palette. I was able to bring in four different stamps into this project. The stamps I used were


For the base of the project, I took out my Lindy's Magicals Powders. This product does require water to activate them but the colors are also so lovely. After that I add some tissue collage paper from Tim Holtz throughout the pages. I then stamped the Gibberish stamp in embossing ink and used white heat embossing powder on it. I added the smaller of the Feather stamp set through the piece and then went in with the Far Out Stamp in a pattern to fill in the blank spaces.
 

Finally, I sprayed the Signals stamp with Lindy Sprays and add some stamping in the paper. To even out the colors, I used my scribble sticks on the piece.
 

For anyone who wants to see how the piece came together, hop over to my Youtube page to watch the video.

Liv


Monday, April 4, 2022

Journal Page by Liv ORMCraftyDesigns Marmara

Hello Everyone! Liv here, and I am so excited to be back for another guest designer post. Art journaling is just so relaxing to me so I decided to do another set of art journal pages. I was able to bring in four different stamps into this project. The stamps I used were,
First up, I stamped using the Writer's Block stamp and embossing ink. I covered it with white embossing powder and then used my heat gun. I decided to use three different colors from Lindy's Gang and once dried I started the stamping. I had some excess ink on the page so used it on a watercolor paper and stamped the Diamond Moon on it.


I cut it out and added it to the page for further dimensions.


I hope to have the video up soon on my YT page on how quickly this page came together, but here are some close-ups so you can see the beautiful textures these stamps added.


Hope you enjoy these pages and get some time to craft away too.

Liv  

Monday, March 28, 2022

The Joy of Painting with Tea

 The Joy of Painting with Tea


Hi, it's Patti Campbell again! Today I am switching it up from my usual tutorial style post. I want to talk to you about what I've been doing these past couple of weeks. Over in the CoMOONity, we have been working on a tea themed swap. I wanted to do something different so I decided on experimenting with using a variety of teas as paint. I am a tea lover so I had a wide variety of tea on hand. 

In small glass jars I brewed a number of different teas. Who knew there were so many different colors of tea? I created a swatch card so I would know what they looked like when they dried, and numbered the jars and swatches accordingly. It was surprising to see how some of the colors changed as they dried. I had a cranberry tea that was red in the jar but dried purple.


The first thing I painted was a couple of ladies with flower crowns on two different types of watercolor paper. The tea reacted differently on the different papers. Interestingly the cranberry tea dried purple on one paper and green on the other. 

Just for fun I tried to paint some abstracts with tea. I splattered and dropped tea onto the paper as well as using a paintbrush and they were fun to do. 


The tea behaved much like watercolor. I had to let each layer dry completely before adding the next. It does however take much longer to dry than watercolor paint. 

Next I tried stamping. I attempted to stamp with the tea on an old book page. This was not very successful. The tea was too pale and didn't show up. Then I tried it on watercolor paper and that also didn't work out. The image was too blurred. 

Then I tried it on fabric. To my surprise this was successful. I used a paintbrush to apply a small amount of tea to the stamp and then carefully applied the stamp to the fabric. I pressed it down firmly and held it down for a few seconds. The result was a clean, opaque image. 

I started thinking of other ways to play with the tea on fabric and landed on tye dye. I tied the fabric and used three different colors of tea in the sections. I wrapped the fabric in plastic wrap and let it sit overnight. The next day I took it out of the plastic and let it dry. I removed the string and I was pleasantly surprised with my results. I really enjoyed this and will definitely do it again in the future. 

I wanted to keep experimenting so I went back to my watercolor paper and stamped with ink, then filled in the images with tea to varying degrees of success. You really have to make sure that ink is dry. I got the best results when I heat set the ink before filling it in. 

One of the stamps I used was the Diamond Moon ArtFoamie by Rita Barakat. I stamped it in Moonlight Duo in Deep Space Blue. After letting the ink dry completely I painted it in with several different tea colors. After the tea dried I cut it out. Happy with the results, I thought it might be fun to stich it to a piece of fabric. I really like the way it is turning out. 


Overall I really enjoyed experimenting with using tea as paint. I will continue to do so in the future. Side note, the tea smells really good! 

Happy spring!
Love and laughter,

๐Ÿ’œPatti๐Ÿ’œ